When the Mackie 8-buss mixing consoles were introduced nearly nine
years ago, it turned the project studios upside down. Never before was there
a such a price/performance ratio in a project studio mixer. Mackie makes
the claim that the 8-buss is capable of sound quality equal to or better
than that of $100,000 consoles. 8-Bus consoles have recorded more platinum
albums and major motion picture soundtracks than any other mixer in their
class -- they set the standard for affordable 8-bus consoles.
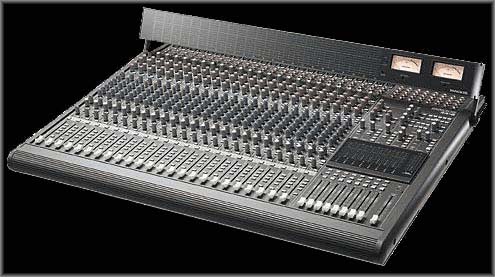
Available in 16. 24, and 32 channel formats, the Mackie 8-buss was designed for nearly any recording situation. A 24 channel expander is available if more channels are required. In fact, the 8-buss can be expanded with up to 96 channels! The Mackie 8-buss also had great routing flexibility as well as excellent sound quality. The gap had narrowed between professional and project mixers.
There have been many reviews written over the years about the Mackie 8-buss mixing console. Many of you are probably familiar and even recorded with the Mackie 8-buss console. It is not my intention in this review to do a comprehensive analysis of the 8-buss console but rather focus on the question; In an ever-expanding market of new audio products, how does the 8-buss hold up in today's studio environment? My goal with this review is to report the answer.
Getting Started:
It was time to expand my project studio. With my current mixer, I had run out of channels to monitor the 8 outputs of my Protools system and the 16 outputs of my Synclavier. I needed to expand the amount of mixing channels and record busses. I had to be able to record live musicians and to give them a good headphone mix while maintaining a separate studio mix. Because I work primarily with electronic music, I needed flexibility in signal routing. I also needed the ability to monitor many audio sources easily. Since most of my studio is digital, the new mixer had to be very quiet. Space was also a consideration. Another requirement was not to break my bank account! I chose to check out the Mackie 24 8-buss since it seemed to meet all these requirements. I also added the optional meter bridge. It was time to add some nearfield monitor speakers so I included the Mackie HR 824 reference speakers (see sidebar review).
Overview and Setup
The Mackie 8-buss comes in 16. 24 and 32 channel versions. For my use, the 24 channel version was the perfect choice. The first thing that got my attention when the console ,meter bridge and speakers arrived was the packing boxes. The equipment was well protected and the cartons are reusable if any of the items ever had to be re-shipped. After unpacking both the console and the meter bridge and admiring their well-designed looks, I started the task of attaching the meter bridge to the console. I looked at the Mackie manuals and was pleased to find them very informative and concise with the typical "user-friendly" approach we have been accustomed to from Mackie. The instructions on how to attach and connect the meter bridge was quick and easy to understand. Removing two bolts on either side of the console and attaching the meter bridge with new bolts was a snap. Next, I plugged in the ribbon connectors from the meter bridge to the console. Attaching the multi-pin connector from the external, rack mount power supply completed the setup assembly.
I wanted to be able to connect the Mackie 8-buss to all my studio gear for evaluation without wiring everything to my patchbays. I was pleasantly surprised that I could connect all my main gear without use of a patchbay. Mackie also supply's an optional stand for the 8-buss but due to space limitations, I opted to set the mixer on top of a rack.
The first step was to plug in the 16 balanced outputs from the Synclavier and the 8 balanced outputs of my Protools system. This was accomplished by connecting all the outputs of the Synclavier and Protools to the 1/4" TRS balanced inputs of the console. Connecting the microphones from my recording room to the 8-buss was easy. The mic inputs in the recording room consists of a panel with 16 XLR connectors which is attached to a snake with XLR connectors on the other end. I just plugged this snake directly into the first 16 XLR balanced inputs of the console. The 8-buss has 48 volt phantom power for the microphones so I was all set. For the headphone mix, I attached a stereo 1/4" cable from my studio headphone boxes to the first of the two headphone outputs. I connected the second headphone output to a special, high quality headphone amplifier in the control room.
Next was connecting the speakers. I set up the Mackie HR824 speakers and connected them to the console's control room outputs via two 1/4" unbalanced cables and plugged in their AC cords. I then connected my second set of speakers and amplifier in my recording room to the studio outputs on the 8-buss via two 1/4" unbalanced cables. Finally, I connected my Panasonic DAT recorder to the mixer's balanced XLR outputs with standard high quality microphone cables. I returned the DAT to the 1/4" 2 track jacks on the console using two XLR to TRS unbalanced cables. Since I am currently using Protools plugins for reverb and effects, there was no need to connect any outboard processors. When, from time to time I do use some outboard effects, it is an easy connection by using the mixer's aux sends, returns and inserts.
That completed all the main connections. The setup was pretty painless. I Just had to make sure I had all the correct cables and connectors to interface all the studio gear with the 8-buss. I was now ready power everything up and hear some audio!
Performance:
After making sure the volume settings on all the gear was turned all the way down, I powered everything up. I was anxious to make sure everything was working properly. I loaded up a song in the Synclavier that uses all 16 outputs and lifted the faders on the 8-buss. All the channels were working and it sounded great! The board sounded very warm and pristine. I got a general balance of the song and then stopped the Synclavier to listen for noise. I was very satisfied with how quiet the 8-buss was. At the normal levels that I mix, I could hear no noise. I turned the master faders up quite high before the noise became objectionable. If I had played the song at that volume, I would have blown myself out of the studio!
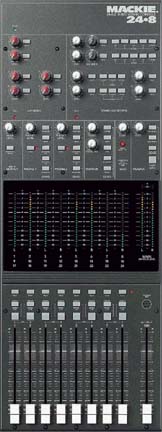
I decided to check out the 8-buss by doing a mix. The sweepable EQ knobs are found above the high- and low-frequency shelving controls. Besides high- and low-frequency shelving EQ, there are two sets of mid-range EQ controls. The mid- to high-frequency EQ is fully parametric, and the low-to mid-frequency EQ is semi-parametric. You can split the EQ so that the high- and low-mid EQ controls affect the channel's signal as usual, while the high- and low-shelving controls are assigned to the Mix-B bus. This is a great feature! There's an EQ bypass button, so that the channel's input signal is allowed to pass clean, without any EQ - independent of the channel's shelving EQ assignment to its Mix-B signal. The Mix-B assignment allows you to simultaneously mix another 24 channels from the mic/line inputs, together with the tape inputs, for a total of 48 channels at mix down! I found the 8-buss EQ to be quite good. It was very smooth and quiet. It became obvious as I got into the mix that the choice of frequencies for each band were carefully thought out for a variety of musical situations.
I synched up a Protools session with the Synclavier for 24 audio channels and recorded a lead vocal. I was very curious as to the quality of the built in mic preamps. While recording the vocal (a very strong voice), I noticed that no matter the gain setting, the mic preamp gave an incredible amount of headroom. The Mackie 8-buss preamps are also very quiet. Mackie has published the mic preamp specifications to be -129.5dBm Equivalent Input Noise and 0.005% THD! During the vocal session, I used the talkback mic on the 8-buss continuously and found it indispensable. I finished the vocal and I mixed everything down to DAT. I was able to do the entire recording and mixing tasks just by switching various buttons and faders on the mixer without having to patch anything through a patchbay. Everything sounded great. I tried many different multi-track recordings through the 8-buss and everything sounded superb.
Conclusion:
I was very impressed with the performance of Mackie's 8-buss mixing console. The mixer's versatility, sonic quality, low noise and price make it an outstanding value. Does the Mackie 8-buss still compete in today's digital age? My conclusion is a resounding yes and then some! Not only do the spec's rival digital, but the sonic character indigenous in the best of analog, is alive and well in Mackie's 8-buss series of consoles. Now, lets make some music!
Suggested Retail Prices:
24-channel 8-Bus, $3,995.
24-channel meter bridge,$795.
24-channelexpander console, $2,995.
Expander console meter bridge, $695.
Mixer stand, $295.
Contact: Mackie Designs, 20205 144th Ave. NE, Woodinville, WA 98072.
(800) 258-6883. (206) 487-4333. Fax (206) 487-4337.
Christopher Currell is a guitarist, composer, synthesist and producer and has worked with many artist including Michael Jackson, Quincy Jones, Cheryl Crow and Paul Simon. He is currently producing and writing music for many artists as well as doing his own solo albums. He can be reached at studio@audiocybernetics.com
MACKIE 8-BUS 24-CHANNEL MIXING CONSOLE - FEATURES AT A GLANCE:
![]() Channel Strip:
Channel Strip:
Mic In
Mic/Line Switch
Line In
Direct Out
Channel Insert
Channel Trim
Flip switch
Aux Sends 1 & 2
Aux Sends 1 & 2 Pre/Post switch
Aux Sends 3-4/5-6
Aux Sends 3-4/5-6 shift switch
Aux Sends 3-4/5-6 Pre/Post switch
Channel/Mix B source switch
Hi-Mid EQ controls (boost/cut, sweep, bandwidth)
Lo-Mid EQ controls (boost/cut, sweep)
Hi Shelving EQ
Lo Shelving EQ
EQ in switch
Low Cut Filter switch (18dB/octave, 75Hz)
Mix B pan control
Mix B level control
Mix B Split switch
Mix B Source
+22dB Overload LED
20dB LED
Pan control
Solo switch and LED
Mute switch and LED
Assignment switches (1-2, 3-4, 5-6, 7-8, L-R)
100mm log-taper fader
 Master Section:
Aux Sends 1 & 2 level controls
Aux Sends 1 & 2 solo switches
Aux Sends 3 & 4, 5 & 6 level controls
Aux Sends 3 & 4, 5 & 6 solo switches
Stereo Aux Returns 1 & 2 level controls
Stereo Aux Returns 1 & 2 balance controls
Stereo Aux Returns 1 & 2 solo and assign switches
Stereo Aux Returns 3 & 4 level controls
Stereo Aux Returns 3 & 4 solo and assign switches
Stereo Aux Returns 5 & 6 level controls
Stereo Aux Returns 5 & 6 solo switches
Mix B master level control
Assign to L/R Mix switch
Phones 1 level control
Phones 1 solo switch and LED
Phones 1 source switches
Phones 2 level control
Phones 2 solo switch and LED
Phones 2 source switches
Studio monitor level control
Control Room monitor level control
Studio & Control Room source switches
Talkback level control
Talkback assign switches
Sub 1-8 L & R meters
Main (or solo level) L & R meters
Sub 1-8 solo switches
Mono and L-R mix assign switches
Talkback mic
Sub 1-8 100mm log-taper faders
L-R main mix 100mm log-taper fader

Rear Panel:
DC power in
Expander port
Main L & R XLR outputs
Submaster/tape outputs (triple-bused).
Tape output operating level switch, +4/-10
Tape Returns
Tape Return operating level switch, +4/-10
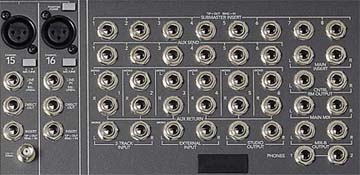
Input and Output:
Channel Strip:
Phantom power (groups of eight)
Mic input
Mic/line switch
Line input
Direct output
Insert
Main:
Submaster inserts
Aux sends
Aux returns
Main return
Control room outputs
Main mix outputs
Mix B outputs
Studio outputs
External inputs
Two track inputs
Phones outputs (1 &2)
MACKIE 8-BUS 24-CHANNEL MIXING CONSOLE - SPECIFICATIONS:
Noise
(Measured 20Hz to 20kHz bandwidth Tape Returns selected, no EQ, Channel Pans alternating L/R, L/R. "Faders up" refers to Unity gain, 0dBu position):
Master fader down
Channels Assigned --
Channel Faders --
Noise 101dBu
Master fader up
Channels Assigned 24
Channel Faders down (mix noise)
Noise -90dBu
Master fader up
Channels Assigned 24
Channel Faders up
Noise -86dBu
+4dBu operating level signal-to-noise ratio
>90dB
Total Harmonic Distortion
1kHz @ + 14dBu measured 20Hz-20kHz, mic input, 1 channel assigned
Direct output 0.0013% typical
L/R Mix output 0.0014% typical
Submaster output 0.0015% typical
Crosstalk
1kHz measured relative to 0dBu, measured 20Hz to 20kHz.
Line In to Adjacent
Channel -91dBu
Channel Fader down
L/R Mix Output -95dBu
Submaster Output -96dBu
Channel muted
L/R Mix Output -95dBu
Submaster Output -96dBu
Channel un-assigned
L/R Mix Output -91dBu
Submaster Output -95dBu
Adjacent Channel assigned
L/R Mix Output -92dBu
Submaster Output -94dBu
Panpot attenuation
L/R Mix Output -87dBu
Submaster Output -87dBu
Frequency Response
20Hz to 60kHz, any
input to any output +0/-1dB
10Hz to 120kHz, any
input to any output +0dB/-3dB
E.I.N.
Mic input, 150 ohm termination,
20Hz-20kHz 129.5dBm
Mic input, shorted,
20Hz-20kHz -136dBV
C.M.R.R.
Mic input, max gain, 1kHz 83dB
Maximum Levels
Mic input +14dBu
All other inputs +22dBu
L/R Mix balanced output +28dBu
All other outputs +22dBu
Impedances
Microphone input 1.5 kohms
Channel insert return 2.5 kohms
All other inputs 10 kohms or greater
All outputs 120 ohms
Equalization
Hi-Mid
Type full parametric (Q) variable from 1/12 to 3 oct.
Range 500Hz-18kHz
Boost/Cut ±15dB
Lo Mid
Type swept
Range 45Hz-3kHz
Boost/Cut ±15dB
Hi
Type shelving
Range 12kHz
Boost/Cut ±15dB
Lo
Type shelving
Range 80Hz
Boost/Cut ±15dB
Lo Cut
Type HP filter
Range 75Hz
Boost/Cut 18dB/oct. slope (Tchebechev)
8Bus Power Supply
Power Consumption 400 watts
Output
+18V 3.5A
-18V 3.5A
+48V 250MA
+12V 1.5A
+5V 3A
Weight: 24 pounds not including power cable.
Dimensions (HxWxD) 3.35" (85mm) x 19.00" (483mm) x 10.08" (256mm)